Better than the History Channel…

For a synthetic adrenaline rush (read: real adrenaline, but no real threat to you, the viewer), watch the following video.  It’s 27 minutes long, and incredibly charming.  Just a warning though; it’s stressful.

UNDERCITY

Anyone who’s owned a pet rat will be reminded of it when they watch this man effortlessly scaling walls and girders, and stealing lithely down into the dark, unknown to so many of us.  This video is sick.

Kinda makes me relieved I just moved to Wisconsin–knowing all that was below me in NYC (and was missing out on) would make me sick with curiosity, and it would only be a matter of time until I tried this myself…

Thank you, Andrew Wonder, for this fantastic video.  And thank you, Steve Duncan, for being the lunatic to show us the way.  🙂

::Gasp:: The horror!

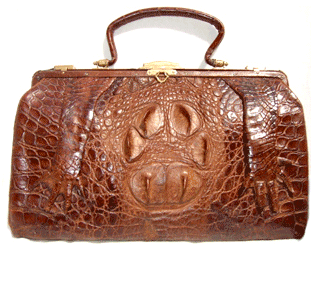
Crocodilia: How to know what you’re buying

So you bought an "Alligator" Victorian bag on Ebay... What is it, really?

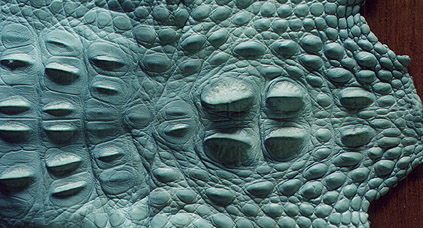
Just a little update for anyone looking to expand their knowledge of crocodilian skins…  I found this great mini-guide and had to share it:

\”Distinguishing Features of Crocodilian Leathers\”

Note these features on the head, especially:

Gator= 2-2-2 pattern of bumps

Caiman (often sold as alligator--don't be fooled!): 4-4-2 pattern of bumps

Croc= 4-2 pattern of bumps

There is often much confusion between alligator and caiman (as they are very closely related).  It’s important to remember that caiman is often sold as gator.  It’s dishonest, but very common.  Educate yourself and know what you’re buying.

Alligator is much more expensive, due to a few factors.  One, it is quite scarce in comparison to caiman.  Alligators can be farmed or caught wild (though there are only 30 days each year that they can be hunted legally).

Alligator hide is MUCH more supple than caiman–you can fold gator in half and there should not be any cracking along the fold (unless you suspect it’s a really old piece of skin and then you should maybe think about identifying it a different way–just a thought).  Caiman is more brittle, and little cracks will appear when you fold it.

Then there are the differences in belly tiles.  The photos on AlligatorFur.com are great references!

As always, look for the DPRs (or ISOs: different names/theories, but each amounting to the fact that you’re only gonna find those little holes on a croc).

For more help with other reptilians, you can find my exotic leathers study guide here.

Grosgrain’s “Embellish Knit Month”

Thanks to \”What Would Emma Pillsbury Wear?\”, I came across yet another fantastic blog today:  Grosgrain!

No bad puns here, don't worry.

For those of us obsessed with Anthropologie’s killer cardigans, this is the site!  And score–for one month straight this woman is re-doing low-priced (or shop-your-closet) knits to look like their higher-priced counterparts.  She takes you through the process of re-sewing/embellishing each look, step by step.  Just look at this adorable Kate Spade look-alike!  Of course, copying designs for production is very, very wrong.  Personal use?  Bring it.

Thank you, Grosgrain, for the lovely inspiration!

“Carnivorous Nights” Rogue Taxidermy Contest

Die Wolperdinger… in his natural habitat… an antiques shop.

Last night I went here.  By myself, if I might add, because I guess this does not sound so fun to most other people I know.  Boy, I’ll bet they’re sorry now. First, Melissa Milgrom, author of Still Life: Adventures in Taxidermy (Ahem, this is on my Amazon wishlist!), began with her story of learning the craft (she mounted one squirrel, and decided that was enough).  She got to learn with the best of the best: the family who has long mounted exotic creatures for the Smithsonian.  Wow.  I don’t even dare to dream.  That’s like getting a private tutoring session with Dr. Bill Bass.

Phar Lap the famous racehorse was mounted by the Jonas Bros (no, not those Jonas Brothers). The musculature in this piece is absolutely incredible!

The contest was preceded with a presentation by Mike Zohn (of Discovery’s “Oddities” fame) on the history and modern revival of taxidermy.  My favorite part of his slideshow was a series of photos documenting the mounting of Phar Lap, the racehorse.  It was amazing to see how they articulated the skeleton, and then built up the musculature/soft tissue with other materials before finally covering it all with the hide (this is a must-do for anyone wanting their horse mounted, as the pre-fab horse forms out there pretty much stink).

Read the NY Times article about the contest here.

My favorite presenter of the night was one Beth Beverly, of Diamond Tooth Taxidermy.  Her first submission was “Elke,” the white Rat Terrier.  Resplendent she was, sitting on her emerald (and finely tasseled!) pillow.  Ms. Beverly told the story of a phone call early in the morning from a stranger… their dog had died… come pick it up.  Elke was Ms. Beverly’s first dog mount.  I think she did a lovely job–very glamourous!  I found it interesting, her take on mounting a pet.  I was touched by the thought and respect she spoke with for the creatures she preserves, both wild and domestic. Ms. Beverly’s second submission was that of a young pullet, dressed as a virgin princess.  But my favorite thing was actually her hat–another chicken (this one red) posing daintily on her head.  Hot!

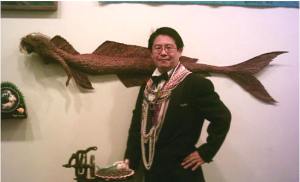
Takeshi Yamada stole the show with his shining personality and fabricated “alien” skulls. Not my thing, but very entertaining!

Her blog is also something to check out.  It’s got a lot of good technical info on taxidermy, great photos and, um… cooking tips?  I would probably not be so brave unless I killed the animal myself and knew how it died, but whatevs–props to her for her “no-waste” mindset, right?  Definitely!  Plus, I noticed that she, too, is looking to make a pair of shoes out of hooves (I TOLD you I was onto something… everyone’s starting to come around now…).

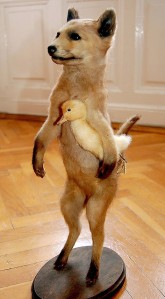
Walking his new friend home? Or just in time for dinner?

All in all, I preferred the presenters who brought forth actual learning opportunities or people who did the taxidermy themselves.  I was hoping for a more technical/scientific approach rather than the raucous, drunken free-for-all it spun into.  Too many people’s “stories” turned out to be just that–stories.  And I wanted the real background on things… not a Coney Island-esque sideshow. Still, I’m glad I went… there were a lot of treasures to be seen (especially the two anthropomorphic fox cubs holding their little duckling friends–both found in Budapest–SO ADORABLE!).

Now it’s personal.

Anything we make is a special thing.  We take the time to put something together, but do we go that extra mile to make sure that someone could find us again, if only by looking at the finished piece?  Tags and labeling are an oft-overlooked detail that can pay off in a big way.  So, in light of the fact that Christmas will soon be upon us, I thought we could use some inspiring ideas for tagging the gifts we make both to give and to sell.  Hooray for Etsy! 🙂

One simple way to make your own:

Last night’s trash becomes today’s crafty treasure!

Remember that take-out container you brought home the other night?  The pad thai is long-gone, but that Number 6 plastic container can live on… give it a better life by turning it into custom jewelry tags or charms!

1.  Cut out the flat parts of the box on the top and bottom (I don’t have to tell you to clean it first, do I?  Of course not, you’re not my ex-suitemate!).

Color lightly on the sanded surface.

2.  Use some 300-400 grit sandpaper to roughen up one side of the plastic (move your sandpaper in little circles).  Then use a colored pencil to scrawl your signature, Etsy shop name, etc.  You don’t need to press hard at all.  In fact, the lighter you go, the better:  when the plastic shrinks, everything you drew on it will become extra dark.  If you like, you can print your name out in a nice font and then trace it.  You can also use a custom stamp you’ve carved or had made (use alcohol-based inks for best results).

Be sure to leave some room for a hole to attach a jump ring; a standard-sized hole punch works perfectly.  Once your hole has been punched and the final shape cut out around the text, it’s ready to shrink!

They’ll twist and turn a little while. When they lie flat (or thereabouts) take them out.

3.  Line a pan with parchment paper and lay the piece on it.  Pop the piece in a preheated oven at around 350 degrees (anywhere between 300-350 degrees should be fine).  Watch it heat up–it will begin to undulate and shrink up.  After a couple of minutes it will stop moving and lay mostly flat.  At this point, you may remove it from the oven.  If it doesn’t lay completely flat, take a glass and press the piece down while it’s still warm.  Don’t use your fingers, as the plastic gets very hot.

4.  Once the piece has cooled, you may want to sand the edges with an emery board if they’re not completely smooth.  Seal the penciled side with a resin gloss spray.  It looks nicer, and it keeps your design from smearing if you penciled too deeply.  Add a jump link through the now-tiny punched hole.

***A trick for figuring out the final size:  On a scrap piece of plastic, trace a 6″ ruler and then shrink it.  Once it’s shrunk, you can tell what the size of your piece needs to be before shrinking.  For example, if you want the finished tag to be 1″ long, hold up the real ruler next to your shrunken one and see where the 1″ falls on the tiny one–the number on the tiny one is how long your plastic piece should be starting out.***

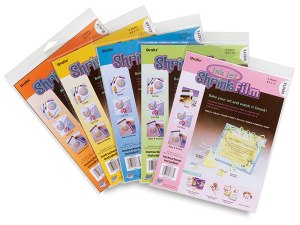
For an even fancier/standardized tag, purchase inkjet-printable shrink film (you CANNOT use recycled plastic here).  Create an image in Adobe or Paint with your name on it.  Think about the scale of the finished tag, and choose your font accordingly (*you want it to be readable once it’s shrunk to size).  DaFont.com is a nice place to download nice fonts for free.  You’ll also want to leave a blank area for the hole you’ll be punching for a jump link.  Copy your art and paste it as many times as you can within an 8.5″x11″ file (100-200 dpi–you may have to see what you like best after experimenting).  Try rotating your pieces to get as many on the page as possible (and don’t forget, each printer’s margins are different; try to account for that).
Once you’ve made a nice image, flatten it and take the opacity down to 25-40%, depending on how saturated your images are (this is to account for the darkening once the plastic is shrunk). You may have to experiment with each page to get a saturation you’re happy with.

Print it out on the inkjet shrink plastic (available here from DickBlick.com), making sure that you have “transparency film” selected in your printer’s paper output.  Cut out each individual piece, punch holes, bake and seal.  Cool, huh?

Now all you have to do is make a beautiful piece of jewelry to go with your fabulous new tags!  🙂

New Tool Demos, Hooray!!

Very interested in checking this out… I really want one of these…

Sign up for emails/invites to interesting webinars like this at BerninaUSA.com.

Or click HERE for the 11-20-10, 10:00am CST (remember this is CENTRAL time)

HERE for the 11-20-10, 4:00pm CST webinar (remember this is CENTRAL time)

I have done one webinar before this.  It was about apparel-sewing shortcuts.  It was pretty good!  I learned a couple new things, and it would be excellent for people who are light sewers hoping to make more professional-looking garments.  I think the video archive is available somewhere on the website.  Don’t be dissuaded by the old-lady pattern looks they’re trying to market throughout the video–the techniques remain practical whether you’re interested in home sewing or high fashion.

Carbonara Homage to Buffalo

Today I came home hungry to a virtually empty fridge.  The only residents were some eggs, a carton of 1% milk, bacon, some leftover cheese (jarlsburg and gorgonzola), apple cider, and one of the saddest-looking onions I’ve ever seen.  Luckily, my hoarding tendencies have left me with a large amount of whole grain pasta, so I won’t actually starve anytime soon–I just run the risk of eating really boring dinners.

Not tonight, however…

Tonight?  I give you… (dun-da-da-DAH!!!)

Buffalo Carbonara!! (HOORAY!!!)

Ingredients:
1 package organic whole wheat spiral pasta
3 pieces bacon, cut into thirds
1/2 cup 1% milk
4 eggs
1/2 cup gorgonzola (crumbled)
salt and black pepper to taste

Directions:

In a large skillet, cook the bacon on medium heat until crispy (or not so crispy, I don’t care). In another pot, cook up the pasta according to directions. When bacon is cooked, transfer to a paper towel.  Do not empty the skillet of its lovely drippings.

Meanwhile, combine eggs, milk, gorgonzola and salt and pepper.  Beat ’em all together.

Once the pasta is done, drain it.  Add just a little water to the skillet. Transfer as much as you can into the skillet and start stirring.  Slowly add the egg/milk mixture and fold into the pasta, keeping it moving so you don’t get glorified scrambled eggs at the bottom of the skillet.  Put the bacon back in too.  Once they’re well mixed, pour the whole thing back into the pasta pot and mix some more.

DONE!  Well, actually, I ended up microwaving a half-package of frozen peas for two minutes and adding that too… I feel guilty if I don’t have any veggies with it.

Very easy, and pretty darn good for a desperate dinner!  Could only be conceived by a Buffalonian.  🙂

The power to do this at home?! SHUT. UP!!!!

So… I like to keep up on the newest creative technologies out there.  I pride myself on being a human encyclopedia for knowing how to make a project from the ground up.  For awhile I did a lot of research on laser cutters, thinking that sooner or later, I’d be investing in one.  Then along came Ponoko, and I didn’t need to have my own anymore.

Then I saw this.

… Hel—loooo, NURSE!  I think I’m in love.  Just imagine the possibilities!  So many beautiful things… so little time!!!

I’m turning into my father–only I acquire sewing equipment while he hoards power tools.  I just can’t seem to get enough to be satisfied.  How could I when they keep coming out with stuff like this?!  I keep thinking, every time I see a new thing, “If I had this machine I could rule the world!”  … and then I get totally distracted by the next big thing only moments after the nice red-bearded FedEx guy has left the previous thing at my door.  ::Sigh::  Such is life.

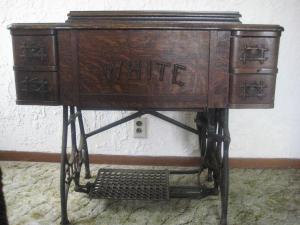
Another White Rotary: the carving reminds me of my Grandfather's cuckoo clock. I couldn't love it any more!

It’s that very pathology that drove my most recent acquisition–and I must say,if it was not the best, then it was one of the best purchases I have ever made.  I got myself a 1917 White Rotary treadle foot machine.  Yessir, when this country goes to Martial Law (and you. mark. my. words. it. will.) and we lose all electricity… I can still make perfectly beautiful handbags.  And trench coats… and tents… and whatever else might need to be sewn in a post-apocalyptic world.

Neuroses aside, I’m very glad I bought it–and for $80, it was an absolute steal!!  Never have I seen one in such beautiful condition–cycles like butter, oooh, how I LOVE her!  Sadly, I had to leave her home when I came back to NYC, and before I could even make anything!!  Sometimes I dream of her… tread-ling softly…

Sorry.  She’s quite distracting.  Anyway, I’m curious…  what’s your next dream tool?  Can be anything, any discipline… just curious… I’d be interested to see what everyone else is lusting after…

I hate this place.

Today I microwaved a cockroach for two minutes… and it DIDN’T DIE.

Previous Older Entries

Email Me at StarsAndGartersWP@gmail.com